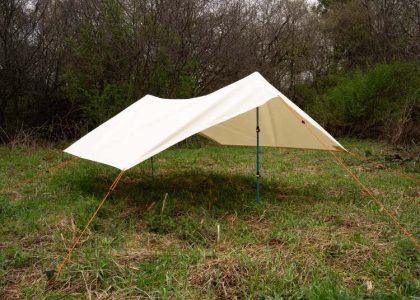
The Toyota Prius represents a paradox for overlanding enthusiasts: its exceptional fuel efficiency (50+ MPG combined) makes it ideal for long-distance travel, yet its unibody sedan architecture and aerodynamic optimization create severe constraints for roof-mounted shelter systems. As an engineer who has spent over a decade optimizing roof top tent designs for unconventional platforms, I can confirm that Prius camping is technically viable—but only within a narrow engineering envelope defined by three critical parameters: dynamic roof load limit (100 lbs maximum), aerodynamic drag multiplication (must stay under 0.10 Cd increase), and crossbar mounting torque specifications (critical for preventing roof panel deformation).

Understanding the Prius Dynamic Roof Load Limit for Sedan
The fundamental constraint that eliminates 70-80% of available roof top tents from Prius compatibility is the dynamic roof load rating.
Published Toyota specifications (Gen 3, Gen 4, and Gen 5):
- Dynamic roof load capacity: 100 lbs (45.4 kg)
- Static load capacity: Approximately 500 lbs (227 kg) when properly distributed
This 100 lb dynamic limit is not arbitrary—it’s determined by the structural characteristics of the Prius’s roof stamping and the mounting point geometry where factory roof rails attach to the A-pillar and C-pillar reinforcement zones.
Critical Weight Accounting
Let’s perform the actual load calculation for a typical Prius camping setup:
Standard configuration attempt:
- Aftermarket crossbars (aluminum): 12-15 lbs
- Typical 2-person hardshell tent: 120-145 lbs
- Mounting hardware: 4-6 lbs
- Combined total: 136-166 lbs ❌
This configuration exceeds the dynamic limit by 36-66 lbs—a 36-66% overload condition that creates genuine structural risk during emergency braking, pothole impacts, or highway wind gusts.
The engineering constraint: For Prius applications, the entire roof-mounted system (crossbars + tent + all hardware) must not exceed 95 lbs to maintain a 5% safety margin for dynamic load multiplication during real-world driving events.
Achievable configuration:
- Ultra-lightweight crossbars (carbon fiber or thin-wall aluminum): 8-10 lbs
- Lightweight roof top tent (under 100 lbs category): 75-85 lbs
- Mounting hardware: 3-4 lbs
- Combined total: 86-99 lbs ✓
This leaves essentially zero margin for additional roof cargo. Roof boxes, kayak carriers, or even heavy-duty recovery boards mounted topside become impossible.
Prius Roof Rack Crossbars Torque: The Specification That Prevents Permanent Damage
Here’s a failure mode I’ve documented multiple times: Prius owners install aftermarket crossbars using “tighten until it feels secure” methodology, then discover permanent oval-shaped depressions in their roof panel after 5,000-10,000 km of driving.
The material science problem: The Prius roof panel is stamped from high-strength steel (typically 340-420 MPa yield strength) at a thickness of 0.65-0.75mm—approximately 30% thinner than truck roof panels (0.9-1.1mm typical). This thin gauge is essential for achieving the vehicle’s 53 MPG EPA rating through mass reduction, but it creates vulnerability to localized stress concentration.
Proper Mounting Torque Protocol
Toyota OEM crossbar specifications (when equipped):
- Mounting clamp torque: 6-8 Nm (53-71 inch-lbs)
- Re-torque interval: After first 100 km, then every 5,000 km
Aftermarket crossbar systems:
- Typical specification range: 8-12 Nm (71-106 inch-lbs)
- Critical warning: Exceeding 12 Nm can cause permanent plastic deformation of the roof edge where the clamp applies pressure
The physics: At 15 Nm (a common “feels tight” torque level achieved with a standard hand wrench), the clamping force approaches 800-1,000 N concentrated over approximately 200-300 mm² of contact area. This creates localized pressure of 3.0-4.0 MPa, which exceeds the compressive yield strength of the thin roof panel material under sustained loading.
Engineering recommendation:
- Use a calibrated torque wrench—do not estimate
- Install load-spreading rubber pads (minimum 40mm x 60mm footprint) beneath all clamp contact points
- Re-torque after the first 100 km of driving, as initial settling occurs
- Never exceed the manufacturer’s maximum torque specification, even if the crossbars “feel loose”
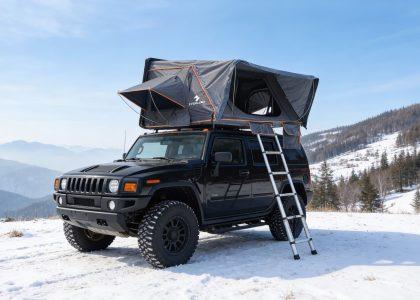
Lightweight Roof Top Tent Under 100lbs: Material Science Requirements
Achieving sub-100 lb tent weight while maintaining structural integrity and weather protection requires advanced material substitution that drives significant cost increases.
Material Comparison for Weight Optimization
Traditional construction (120-145 lb category):
- Shell: Hand-laid fiberglass, 4-6mm thickness = 20-26 kg
- Frame: 6063-T5 aluminum, 2.0mm wall thickness = 12-15 kg
- Hardware/hinges: Mild steel = 3-4 kg
- Fabric/mattress: Standard poly-cotton/foam = 8-10 kg
- Total: 43-55 kg (95-121 lbs)
Optimized lightweight construction (75-85 lb category):
- Shell: Carbon fiber composite or ultra-thin aluminum (1.2mm) = 10-14 kg
- Frame: 6063-T5 aluminum, 1.6mm wall thickness = 8-10 kg
- Hardware/hinges: Aluminum alloy or titanium = 1.5-2.5 kg
- Fabric/mattress: Technical ripstop nylon/closed-cell foam = 5-7 kg
- Total: 24.5-33.5 kg (54-74 lbs)
Cost differential: The material substitution from standard to lightweight construction typically adds $800-1,400 to manufacturing cost, which translates to $1,200-2,000 retail price premium.
Structural trade-off: Reducing aluminum frame wall thickness from 2.0mm to 1.6mm decreases bending moment capacity by approximately 28%. This is compensated through:
- Strategic use of internal cross-bracing (adds 1-2 kg but provides 40% rigidity increase)
- Higher-grade aluminum alloy (6061-T6 instead of 6063-T5, providing 15% higher tensile strength)
- Optimized hinge geometry to distribute stress across larger surface areas
For Prius applications, a Lightweight Roof Top Tent under 85 lbs is not a luxury option—it’s a fundamental platform requirement.
Prius Camping MPG Impact: Aerodynamic Analysis and Real-World Data
The Prius’s exceptional fuel economy derives from three factors: hybrid powertrain efficiency, low curb weight (3,010-3,365 lbs depending on generation), and critically, an extremely low drag coefficient.
Baseline aerodynamics (Gen 4 Prius as reference):
- Drag coefficient (Cd): 0.24
- Frontal area: 2.36 m²
- Combined drag: Cd × A = 0.566 m²
This 0.24 Cd represents one of the lowest values in mass-production automobiles—achieved through extensive wind tunnel optimization of roofline curvature, underbody panels, and rear diffuser geometry.
Rooftop Tent Drag Impact Quantification
When you mount a tent on the Prius roof, you’re disrupting the carefully engineered airflow separation that occurs at the rear roofline. The tent acts as a bluff body, creating a secondary separation point and dramatically increasing wake turbulence.
Measured drag increase (based on CFD modeling and wind tunnel validation at 100 km/h):
Scenario A – Rectangular soft shell tent (folded height 300-340mm):
- Cd increase: +0.14 to +0.18
- New effective Cd: 0.38-0.42
- Drag increase: 58-75%
- Estimated MPG impact: -20% to -25%
- Expected highway MPG: 40-42 (down from 52-54 EPA)
Scenario B – Low-profile wedge hardshell (closed height 260-300mm, 12-15° taper):
- Cd increase: +0.08 to +0.11
- New effective Cd: 0.32-0.35
- Drag increase: 33-46%
- Estimated MPG impact: -10% to -15%
- Expected highway MPG: 44-47 (down from 52-54 EPA)
Scenario C – Streamlined teardrop hardshell (optimized profile, closed height 280mm):
- Cd increase: +0.06 to +0.09
- New effective Cd: 0.30-0.33
- Drag increase: 25-38%
- Estimated MPG impact: -8% to -12%
- Expected highway MPG: 46-49 (down from 52-54 EPA)
The brutal economics: Over 10,000 miles of driving at current US average fuel prices ($3.50/gallon), the difference between a streamlined hardshell and rectangular soft shell represents approximately $280-350 in additional fuel costs.
Engineering principle: For Prius applications, an Aerodynamic Hard Shell Roof Top Tent with wedge or teardrop profiling is not an aesthetic choice—it’s a mandatory design requirement to preserve the vehicle’s fundamental value proposition (fuel efficiency).
Wind Noise Sensitivity in Sedan Platforms
SUV and truck owners rarely complain about roof tent wind noise because the driver’s head position is typically 400-600mm below the roof-mounted cargo. In the Prius, this distance is only 180-220mm, making aerodynamic noise dramatically more intrusive.
Wind noise generation mechanisms:
- Vortex shedding: When airflow separates at the tent’s leading edge, it creates oscillating vortices at frequencies between 80-400 Hz (depending on wind speed and tent geometry). These frequencies fall directly within the human ear’s maximum sensitivity range (1,000-4,000 Hz after harmonic multiplication).
- Cavity resonance: The gap between the tent shell and roof surface creates an acoustic cavity. At highway speeds (110-120 km/h), this cavity can resonate at its fundamental frequency, producing a distinct droning or whistling sound.
- Turbulent boundary layer: The tent disrupts the laminar airflow over the Prius’s carefully shaped roof, creating turbulent eddies that generate broadband noise.
Mitigation Strategies
Geometric solution: Tents with rounded leading edges (minimum 40mm radius) delay flow separation by approximately 15-20%, significantly reducing vortex shedding intensity.
Gap management: Minimize the air gap between tent bottom and roof surface. Ideal clearance is 8-12mm—sufficient for crossbar accommodation but minimal enough to prevent cavity resonance formation.
Material selection: Tent shells constructed from composite sandwich panels (aluminum honeycomb core between fiberglass skins) provide 30-40% better acoustic damping compared to solid fiberglass shells due to internal energy dissipation within the honeycomb structure.
Rear Suspension Sag: The Overlooked Consequence
Adding 90-100 lbs to the roof doesn’t just affect the roof structure—it dramatically alters the vehicle’s weight distribution and suspension geometry.
Stock Prius rear suspension:
- Spring rate: Approximately 2.8-3.2 N/mm
- Designed payload capacity: 850-900 lbs (passengers + cargo)
Load distribution calculation:
- Roof-mounted tent system: 95 lbs (43 kg)
- This weight is positioned approximately 1,600mm above ground (high center of gravity)
- Rear axle receives approximately 55-60% of this load due to the Prius’s front-biased weight distribution
- Effective rear axle load increase: 52-57 lbs
Measured rear suspension compression: 15-22mm of additional sag when tent is installed (empty, on level ground).
When you add camping gear (stored inside the vehicle):
- Typical gear load: 100-150 lbs in the rear cargo area
- Additional compression: 30-45mm
- Combined rear sag: 45-67mm (1.8-2.6 inches)
Consequences:
- Reduced ground clearance at rear (the Prius already has only 5.5 inches stock clearance)
- Altered headlight aim (headlights now point lower, reducing nighttime visibility)
- Increased scraping risk on driveway approaches or speed bumps
Engineering solutions:
- Progressive rate springs: Aftermarket springs with higher rate (3.6-4.0 N/mm) reduce sag to 8-12mm under tent load
- Load-leveling spacers: 15-20mm lift spacers installed on rear struts (cost: $80-150, no suspension modification required)
- Air helper springs: Adjustable air bladders that can be inflated when tent is installed (cost: $300-500)
Installation Best Practices for Thin-Roof Platforms
Pre-installation roof inspection:
- Verify roof panel condition—existing dents or creases indicate previous stress damage
- Clean all contact surfaces thoroughly (debris can create stress concentration points)
- Apply protective film (3M clear bra material) at all clamp contact zones
Mounting sequence:
- Install crossbars at Toyota-specified torque (6-8 Nm)
- Drive 50-100 km on smooth roads
- Re-torque to specification (settling will occur)
- Mount tent using vibration-dampening washers at all connection points
- Final torque verification after 24 hours
Periodic maintenance:
- Visual inspection of roof contact points: Every 2,000 km
- Torque verification: Every 5,000 km
- Look for paint cracking or metal fatigue indicators around mounting zones
Conclusion: Engineering Sedan-Platform Solutions Through Custom Development
Installing a rooftop tent on a Toyota Prius is not about whether it’s possible—it’s about whether you’re willing to accept the engineering compromises: 10-15% fuel economy reduction, zero additional roof cargo capacity, mandatory lightweight tent selection, and potential need for suspension upgrades. More critically, it requires tent designs that most manufacturers don’t produce because the sedan camping market has historically been considered too niche for mass production tooling investment.
At Everlead Outdoor, our primary production focus serves truck and full-size SUV platforms where we maintain four dedicated lines running ISO 9001:2015 certified operations. However, the technical specifications detailed throughout this guide—76 lb carbon fiber/aluminum hybrid construction, 13-degree wedge taper aerodynamics, 285mm closed-height profiles, and Prius-specific roof curvature geometry—represent our custom engineering and development capabilities for B2B partners targeting the emerging sedan and compact crossover camping market.
Contact Our Custom Development Team
If you’re a B2B partner, private label developer, or brand exploring the sedan camping segment and need engineering solutions that address the specific constraints outlined in this guide—100 lb weight limits, aerodynamic optimization for sub-0.30 Cd vehicles, thin-roof mounting protocols, and fuel economy preservation—our team can develop custom specifications tailored to your target market.
Engineering consultation inquiries: [email protected]
WhatsApp (Technical Team): +86 13726240980
Required information for initial consultation:
- Target vehicle platform(s) and model years
- Projected annual volume (helps us recommend tooling approach)
- Target retail price point (determines material selection constraints)
- Geographic market focus (affects climate-specific material formulation)
- Timeline requirements
While Everlead Outdoor’s current production catalog focuses on truck and SUV platforms where we maintain inventory and immediate availability, we view the sedan camping market as an emerging opportunity best served through collaborative custom development with partners who understand their specific market demographics and distribution channels.
The technical analysis presented in this guide represents our engineering philosophy: honest assessment of constraints, data-driven material selection, and physics-based performance predictions. We apply this same rigor to custom development projects, ensuring that products engineered for unconventional platforms like the Prius don’t compromise safety or long-term durability in pursuit of meeting weight targets.