Keeping your tent cool during summer camping requires more than just purchasing an air conditioner—proper installation and venting techniques determine whether you’ll sleep comfortably or wake up in a humid, insufficiently cooled space. Installing and venting a tent air conditioner for maximum cooling involves creating a sealed exhaust port through tent fabric or windows, positioning the unit on stable ground near power sources, and ensuring proper condensate drainage to maintain efficiency and prevent water damage. This comprehensive guide covers ventilation methods, optimal placement strategies, sealing techniques to prevent cool air loss, drainage requirements, and troubleshooting common issues like water leakage that compromise cooling performance.
Table of Contents
- How to vent a portable air conditioner in a tent?
- Do you have to drain a tent air conditioner?
- Where do you put an air conditioner in a tent?
- How to seal a tent for air conditioning?
- Why is my tent air conditioner leaking water?
How to vent a portable air conditioner in a tent?
To vent a portable air conditioner in a tent, route the exhaust hose through a zippered door, mesh window panel, or custom-fitted port in the tent fabric, then seal the opening around the hose with fabric panels, Velcro attachments, or weatherstripping to prevent hot air from re-entering the tent. The exhaust must direct hot air completely outside the tent structure to achieve effective cooling, as any recirculation of exhaust air drastically reduces cooling efficiency.
Proper venting is the single most critical factor determining your tent AC’s cooling performance, as inadequate exhaust routing can reduce efficiency by 40-60%.
Venting Through Tent Doors
The simplest venting method utilizes your tent’s existing door opening:
Full Door Method: Partially unzip the door just enough to pass the exhaust hose through, then use a door panel insert—a rectangular piece of fabric with a circular hole cut to match the hose diameter—to fill the remaining gap.
Advantages: No permanent modifications to tent fabric, easy to set up and remove, works with any tent design.
Disadvantages: Blocks primary entry/exit point, creates security concerns with partially open doors, may allow insects entry through imperfect seals.
Secure the panel using the tent’s existing zipper by sandwiching the fabric insert between zipper teeth, then seal gaps around the hose with adhesive-backed foam weatherstripping.
Venting Through Mesh Windows
Many tents feature mesh window panels that provide ideal venting locations:
Window Insert Method: Create a custom fabric panel sized to match your tent window dimensions, cut a circular hole matching your exhaust hose diameter (typically 5-6 inches), and attach the panel over the mesh window using Velcro strips sewn to both the panel and tent frame.
This approach preserves door functionality while creating a dedicated exhaust port. The mesh window’s elevated position often improves hot air evacuation since heat naturally rises.
Custom Tent Venting Ports
For frequent tent AC users, permanent venting solutions offer superior performance:
Zipper Installation Method: Install a zipper panel specifically designed for AC venting, creating a closeable port when the AC isn’t in use. These panels typically feature:
- Reinforced fabric borders to prevent tearing
- Built-in hose collar with adjustable diameter
- Storm flap to cover the opening when not in use
- Integrated seal to prevent air leakage
Professional-grade venting kits designed for camping tents are available, featuring universal sizing that adapts to most portable AC exhaust hoses.
Exhaust Hose Management
Proper hose configuration maximizes cooling efficiency:
Minimize Hose Length: Keep the exhaust hose as short as possible—ideally under 5 feet. Longer hoses increase back-pressure on the compressor, reducing efficiency and potentially causing overheating.
Avoid Excessive Bends: Limit sharp angles and kinks in the hose routing. Each 90-degree bend reduces airflow by approximately 10%, forcing the compressor to work harder.
Insulate When Possible: In extreme heat conditions, wrapping the exhaust hose with reflective insulation prevents radiant heat transfer back into the tent interior.
Secure Positioning: Use bungee cords or clips to prevent the hose from disconnecting during operation, as even small gaps allow hot exhaust air to recirculate into the tent.
Dual-Hose vs. Single-Hose Systems
Understanding your AC configuration affects venting requirements:
| System Type | Venting Requirement | Efficiency | Complexity |
| Single-Hose | One exhaust port | Lower (creates negative pressure) | Simple setup |
| Dual-Hose | Intake and exhaust ports | Higher (balanced air pressure) | More complex installation |
Single-hose units pull air from inside the tent to cool the condenser, then exhaust it outside, creating negative pressure that draws hot outside air back into the tent through fabric pores. Dual-hose systems eliminate this issue by drawing cooling air from outside, maintaining neutral tent pressure.
Do you have to drain a tent air conditioner?
Most modern tent air conditioners feature self-evaporative technology that eliminates manual draining requirements under normal conditions, but units operating in high-humidity environments or during extended runtime may require periodic drainage through a bottom drain plug or continuous drainage via an attached hose. The drainage necessity depends on ambient humidity levels, cooling load intensity, and the unit’s specific evaporation capacity design.
Understanding your AC’s drainage system prevents unexpected shutdowns and water damage to tent floors.
Self-Evaporating AC Technology
Contemporary portable air conditioners use exhaust heat to evaporate condensate automatically:
The AC collects moisture removed from tent air during the cooling process in an internal reservoir. Hot air from the condenser passes over this water before being exhausted, causing evaporation that eliminates most collected moisture through the exhaust hose.
This technology works effectively when:
- Humidity levels remain below 70%
- The unit operates intermittently with cool-down periods
- Ambient temperatures don’t exceed 95°F
- The exhaust system functions properly
Under these conditions, the evaporation rate matches or exceeds condensation rate, requiring no manual intervention.
When Manual Drainage Becomes Necessary
Certain operating conditions overwhelm self-evaporation capacity:
High Humidity Environments: Coastal camping, lakeside locations, or tropical climates generate excessive condensate that exceeds evaporation capability. When relative humidity exceeds 70-80%, expect to drain the unit every 6-12 hours of operation.
Continuous Operation: Running the AC constantly for 8+ hours without breaks doesn’t allow sufficient evaporation time, causing water to accumulate in the reservoir.
Maximum Cooling Loads: Operating at the coldest temperature setting in extremely hot conditions produces maximum condensate while potentially reducing exhaust air temperature below optimal evaporation levels.
Drainage Methods
Tent air conditioners typically offer two drainage options:
Manual Drainage (Plug Method):
- Power off and unplug the unit completely
- Position a shallow collection pan beneath the drain port
- Remove the rubber drain plug on the unit’s bottom panel
- Allow water to fully drain (typically 0.5-2 liters depending on reservoir size)
- Replace the drain plug firmly to prevent leaks
- Resume operation
Most units include a “Full Tank” indicator light that illuminates when the reservoir reaches capacity, automatically shutting down the compressor to prevent overflow.
Continuous Drainage (Gravity Method):
For extended camping trips, attach a drain hose to the unit’s drainage port:
- Connect a 1/2-inch inner diameter vinyl hose to the threaded drain port
- Route the hose to exit the tent at a lower elevation than the AC unit
- Ensure the hose slopes continuously downward without kinks or loops
- Discharge into a collection container or absorption area away from tent perimeter
Gravity drainage requires the discharge point to be at least 6-12 inches lower than the AC unit for effective water flow.
Drainage Frequency Guidelines
Expected drainage intervals based on operating conditions:
| Humidity Level | Temperature | Continuous Runtime | Expected Drainage Frequency |
| Below 50% | 75-85°F | 8 hours | Rarely required (self-evap sufficient) |
| 50-70% | 85-95°F | 8 hours | Every 12-24 hours |
| 70-85% | 85-95°F | 8 hours | Every 6-12 hours |
| Above 85% | Above 95°F | 8 hours | Every 4-8 hours or continuous drain |
Preventing Drainage-Related Issues
Maintain proper drainage system function with these practices:
Regular Monitoring: Check the water level indicator or listen for shutdown alerts during operation, especially during initial use in a new location to establish typical drainage patterns.
Clean Drain Ports: Debris, algae, or mineral deposits can clog drainage systems. Flush the drain port monthly with a mixture of water and white vinegar to maintain clear flow.
Proper Unit Leveling: Ensure the AC sits level or with a slight tilt toward the drain port. Units tilted away from the drain may not fully empty, leaving stagnant water that breeds mold.
Condensate Pump Option: For situations where gravity drainage isn’t feasible due to elevation constraints, consider a small condensate pump that actively evacuates water upward to a discharge point.
Where do you put an air conditioner in a tent?
The optimal position for a tent air conditioner is on level ground near the tent’s entrance or window, with the exhaust vent facing outward, positioned away from sleeping areas to minimize noise disturbance while maintaining accessibility to power sources and drainage points. Proper placement balances cooling efficiency, noise management, safety considerations, and practical access for monitoring and maintenance throughout operation.
Strategic AC positioning can improve cooling performance by 20-30% compared to poorly planned installations.
Ideal Placement Locations
Consider these priority factors when selecting your AC position:
Near Ventilation Points: Position the unit within 3-5 feet of your chosen exhaust location (door, window, or custom vent). Shorter exhaust hose runs improve efficiency and reduce noise from air turbulence within the hose.
On Stable, Level Ground: The AC must sit on firm, level surface to ensure proper compressor operation and drainage function. Uneven positioning causes vibration noise, premature component wear, and potential drainage backup.
Away from Sleeping Zones: Most tent ACs generate 45-55 decibels during operation—comparable to conversation volume. Positioning the unit at least 6-8 feet from sleeping bags or cots significantly reduces sleep disruption.
Central Cooling Distribution: For larger family tents, central placement allows cooled air to reach all tent zones more evenly, though this must be balanced against exhaust routing requirements.
Ground Surface Preparation
Proper foundation preparation prevents common installation problems:
Use a Platform Board: Place a piece of plywood, rigid plastic board, or specialty camping platform beneath the AC unit to:
- Prevent the unit from sinking into soft ground
- Create barrier against ground moisture
- Provide stable vibration dampening
- Protect tent floor fabric from unit weight and heat
Platform dimensions should extend 2-3 inches beyond the AC footprint on all sides. A 24″ × 18″ board works for most tent AC units.
Ground Cloth Protection: If placing the AC directly inside the tent on the floor fabric, use a waterproof ground cloth beneath and around the unit to protect against condensation drips and accidental drainage spills.
Elevation Considerations: Raising the unit 2-4 inches off the ground using a low platform or corner blocks improves airflow beneath the unit, enhancing cooling efficiency and facilitating gravity drainage.
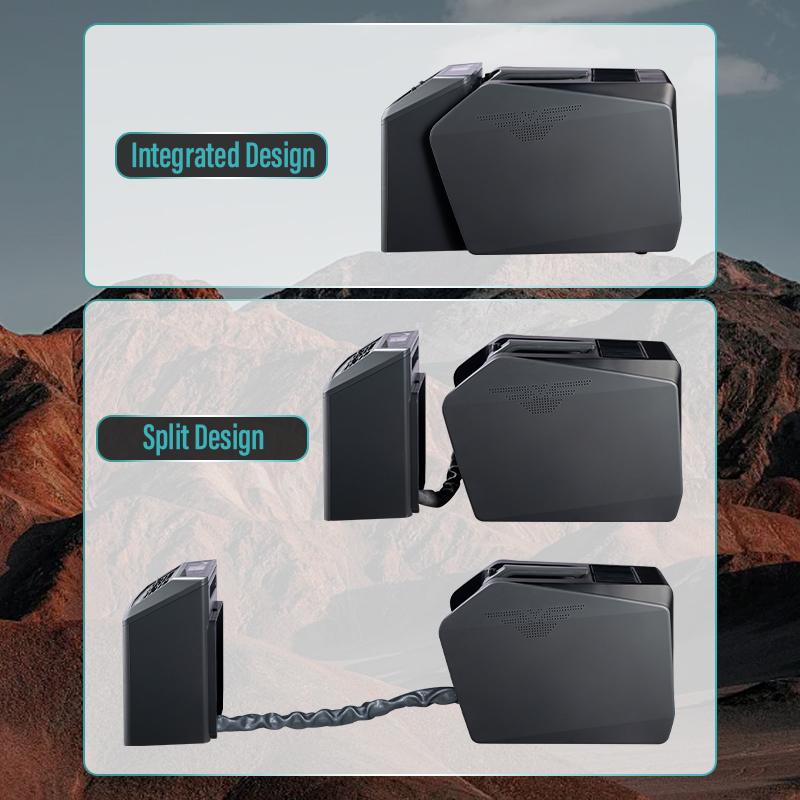
Inside vs. Outside Tent Placement
Each configuration offers distinct advantages:
Inside Tent Placement (Most Common):
Advantages:
- Direct cooling of tent interior without air loss
- Protection from weather, theft, and wildlife
- Easier access for controls and monitoring
- More efficient cooling distribution
Disadvantages:
- Consumes valuable tent floor space
- Generates internal noise
- Requires careful venting and sealing
- May create condensation on cold surfaces
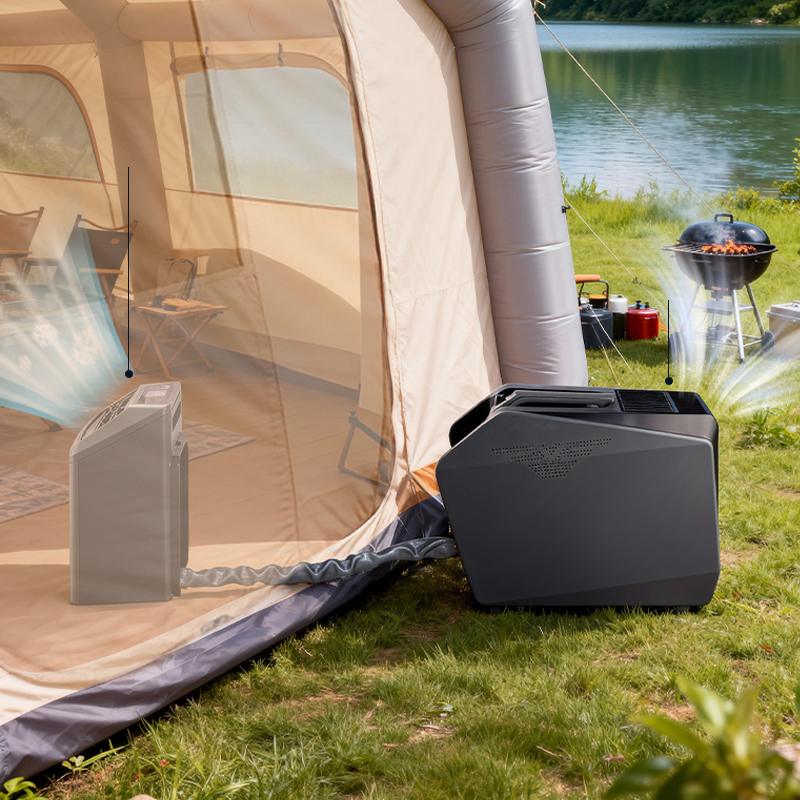
Outside Tent Placement (Alternative):
Advantages:
- Eliminates internal noise disturbance
- Frees interior space
- Simplifies exhaust venting
- Reduces condensation concerns
Disadvantages:
- Requires ducting cool air into tent with associated air loss
- Exposes unit to weather and security risks
- More complex installation requirements
- Potential for wildlife interference
For most camping scenarios, inside placement provides superior overall performance, with noise concerns addressed through strategic positioning away from sleeping areas.
Power Source Proximity
Electrical access significantly influences placement decisions:
Generator Positioning: If using a portable generator for power, position the AC near the tent side closest to the generator while maintaining safe distance (at least 15 feet) to prevent carbon monoxide infiltration and excessive noise.
Extension Cord Routing: When using extension cords from a power station or campground hookup, route cables along tent edges rather than across high-traffic pathways to prevent tripping hazards. Use outdoor-rated cords rated for the AC’s amperage requirements.
Power Station Placement: For battery-powered setups, position the portable power station adjacent to the AC (within 3-6 feet) to minimize voltage drop in connecting cables. Ensure the power station sits outside the direct cold airflow path, as some units reduce charging efficiency at temperatures below 50°F.
Multi-Room Tent Considerations
Large family tents with separate sleeping compartments require strategic approach:
Cooling Zone Priority: Position the AC in the main common area if it’s the primary living space during hot daytime hours, or in the largest sleeping room for overnight comfort priority.
Airflow Enhancement: Use battery-operated tent fans positioned in doorways between compartments to circulate cooled air throughout the tent structure. This distributes cooling 40-50% more effectively than relying on natural air movement alone.
Dual Unit Setup: For premium comfort in very large tents (8+ person capacity), consider two smaller AC units positioned in separate zones rather than one large unit, providing better temperature distribution and redundancy.
Safety and Access Requirements
Maintain proper clearances for safe operation:
Ventilation Clearances: Ensure minimum 12-inch clearance on the intake side of the AC and 6-inch clearance on exhaust areas to prevent air recirculation and overheating.
Fire Safety: Keep the AC at least 24 inches away from sleeping bags, clothing, gear storage, and any flammable materials, as the exhaust air reaches temperatures of 100-120°F.
Trip Hazard Prevention: Position the unit against tent walls or in corners away from main traffic patterns to minimize accidental contact or tripping over power cords.
Access for Maintenance: Ensure you can easily reach control panels, drainage ports, and power connections without moving heavy gear or disturbing sleeping arrangements.
How to seal a tent for air conditioning?
To seal a tent for air conditioning, close all windows and mesh panels with their solid fabric covers, seal zippered seams with temporary weatherstripping or specialized zipper tape, and create airtight exhaust port seals using foam gaskets or fabric panels that prevent cool air from escaping and hot air from entering. Proper sealing can improve cooling efficiency by 35-50% compared to unsealed tents, reducing power consumption and achieving comfortable temperatures faster.
A well-sealed tent maintains temperature differentials of 20-30°F from outside ambient conditions, while poorly sealed tents struggle to achieve even 10-15°F reduction.

Window and Vent Sealing
Tent windows and ventilation panels create the largest air leakage paths:
Close All Mesh Panels: Replace every mesh window and vent panel with its solid fabric counterpart. Mesh allows massive air exchange—a single 12″ × 12″ mesh window permits airflow equivalent to a 2-inch gap around the entire tent perimeter.
Zipper Sealing Techniques:
- Close all zippers completely, ensuring teeth engage fully along entire lengths
- Apply temporary zipper sealing tape along the inside of closed zippers
- For critical seals, place a fabric draft stopper (rolled towel or pool noodle) against zipper seams
- Verify no light penetrates through zipper gaps when viewed from inside with external light source
Velcro Closures: Many tent windows use Velcro attachments rather than zippers. Ensure complete contact along all Velcro strips, pressing firmly to engage hooks and loops. Worn Velcro may require replacement strips for effective sealing.
Ground-Level Sealing
The tent floor perimeter represents another significant leakage zone:
Rainfly Deployment: Even in dry weather, deploy the full rainfly to create a dual-layer barrier that dramatically reduces air infiltration through tent fabric pores. The air gap between tent body and rainfly provides insulation that improves cooling retention.
Ground Seal Enhancement: Ensure the tent floor extends slightly beyond the wall bases, creating a seal against the ground. Place rocks, sand bags, or dirt along the tent perimeter to weight down edges and close gaps between fabric and ground.
Vestibule Sealing: If your tent includes a vestibule or awning area, seal it completely or remove it during AC operation, as these semi-enclosed spaces create convection loops that pull cool air from the tent interior.
Exhaust Port Sealing
The exhaust port requires careful attention to prevent hot air recirculation:
Hose Collar Installation:
- Cut a circular opening in your vent panel exactly matching the exhaust hose outer diameter
- Install a flexible rubber or foam collar around the hole edges
- Insert the exhaust hose through the collar, ensuring snug contact around the full circumference
- Seal any remaining gaps with adhesive foam weatherstripping or aluminum HVAC tape
Panel Integration: The fabric panel containing the exhaust port must seal completely against the tent opening:
- Use multiple Velcro attachment points around the panel perimeter (minimum 6-8 points)
- For zipper integration, close the zipper completely around the panel edges
- Inspect for any light gaps indicating air leakage paths
- Consider double-layer panels with foam insulation between layers for maximum sealing
Door Entry Solutions
Maintaining tent access while preserving cooling requires creative solutions:
Dual-Door Tents: If your tent has multiple doors, dedicate one door to the AC exhaust installation and use the opposite door for entry/exit, keeping the AC door completely sealed during operation.
Zippered Door Management: For single-door tents with AC exhaust through the door:
- Open the door only when necessary, minimizing opening duration
- Consider installing a clear vinyl door flap that allows passage while providing some seal
- Create a small entry protocol where you quickly enter and immediately re-seal behind you
Airlock Vestibule: For extended camping with frequent tent access, construct a simple vestibule airlock using a second smaller tent or tarp structure attached to the main tent entrance, creating a buffer zone that minimizes cool air loss during entry.
Fabric Permeability Solutions
Even sealed tents experience air infiltration through fabric itself:
Fabric Selection Awareness: Lightweight backpacking tents use highly breathable fabrics that permit significant air exchange even when all openings are sealed. These tents may require additional sealing measures.
Temporary Sealing Methods:
- Apply water-based fabric sealer spray to tent interior surfaces (test small area first)
- Install emergency reflective blankets against tent walls using clips or tape as temporary air barriers
- Use tarp material draped inside tent over walls to reduce air permeability in critical cooling zones
Long-Term Solutions: For serious tent AC users, consider upgrading to tents specifically designed with AC compatibility, featuring:
- Denser fabric weaves with lower air permeability ratings
- Factory-installed AC port sleeves with integrated sealing
- Enhanced insulation properties that retain temperature differentials
Sealing Effectiveness Testing
Verify your sealing quality using these methods:
Light Test: After dark, place a bright light source outside the tent and observe from inside. Any visible light indicates air leakage paths requiring additional sealing.
Smoke Test: Carefully use incense or a smoke pen around tent perimeters while the AC operates. Smoke drawn into gaps reveals leakage points needing attention.
Temperature Differential Monitoring: Use a thermometer to measure inside vs. outside temperature. Well-sealed tents should achieve 25-30°F differentials within 30-45 minutes of AC operation.
Runtime Observation: A properly sealed tent reaches target temperature and allows the AC to cycle off periodically. If the AC runs continuously without reaching setpoint, inadequate sealing is likely the cause.
Sealing Material Recommendations
Essential supplies for effective tent AC sealing:
| Material | Purpose | Where to Use | Expected Cost |
| Foam weatherstripping | Gap sealing | Zipper seams, panel edges | $8-15 per roll |
| Aluminum HVAC tape | Exhaust hose sealing | Hose connections, port perimeter | $10-18 per roll |
| Velcro strips (adhesive) | Panel attachment | Custom vent panels, door inserts | $12-20 per set |
| Zipper lubricant/wax | Ensure complete zipper closure | All tent zippers | $5-8 per tube |
| Reflective emergency blankets | Temporary insulation | Interior wall coverage | $10-15 for 4-pack |
Most sealing materials are removable, allowing you to restore tent ventilation for non-AC camping trips.
Why is my tent air conditioner leaking water?
Tent air conditioner water leakage typically occurs due to four main causes: clogged condensate drain systems preventing proper water evacuation, improper unit leveling causing water to pool in incorrect areas, frozen evaporator coils that thaw and overflow the collection pan, or damaged drain pans and seals allowing water to escape the intended drainage path. Identifying the specific cause requires systematic inspection of drainage components, unit positioning, and operational parameters.
Water leakage not only damages tent floors and gear but also indicates reduced cooling efficiency that wastes power and fails to maintain comfortable temperatures.
Blocked Condensate Drain
The most common leakage cause involves obstructed drainage systems:
Symptom Identification: Water pools beneath or around the AC unit, particularly concentrated near the drain port area. The full tank indicator may or may not illuminate, depending on where the blockage occurs.
Root Causes:
- Algae or mold growth inside the drain line from stagnant water
- Dirt, debris, or insects entering the drain port
- Mineral deposits from hard water accumulation
- Kinked or pinched external drain hose
Solution Steps:
- Power off and unplug the unit completely
- Remove the drain plug and inspect for visible blockages
- Use a thin, flexible wire or pipe cleaner to clear the drain passage
- Flush the drain line with a 50/50 mixture of white vinegar and water
- Allow the cleaning solution to sit for 15-20 minutes, then flush with clean water
- For external drain hoses, disconnect and inspect for kinks or debris
- Consider periodic preventive cleaning every 2-3 weeks during heavy use
Prevention: Add a small amount (1-2 tablespoons) of white vinegar or condensate pan treatment tablets to the drain pan monthly to prevent algae and mold formation.
Improper Unit Leveling
AC units must sit level or with slight tilt toward the drain port:
Symptom Identification: Water appears on the uphill side of a tilted unit or leaks from seams and joints rather than the designated drain area.
Root Causes:
- Uneven ground causing the unit to tilt away from drain
- Soft soil allowing one side of the unit to sink
- Platform board not level
- Deliberate but incorrect tilting in wrong direction
Solution Steps:
- Use a carpenter’s level or smartphone level app to check unit orientation
- The unit should be perfectly level side-to-side
- A slight tilt (1-2 degrees) toward the rear drain port is acceptable and sometimes beneficial
- Never tilt the unit backward if the drain is located on the front panel
- Adjust by placing shims under low corners or releveling the platform
- Verify level in both horizontal axes (front-to-back and side-to-side)
Correct Positioning: Most portable AC units function optimally when perfectly level, relying on internal pan design to channel water to drains. Consult your specific model’s manual for any manufacturer-recommended tilt specifications.
Frozen Evaporator Coils
Ice formation on internal coils creates overflow conditions when it melts:
Symptom Identification: Water leakage occurs after the unit has run for several hours, often accompanied by reduced cooling performance and unusual icing visible on external vents or air outlets.
Root Causes:
- Operating the AC in temperatures below 65°F
- Restricted airflow from dirty air filters
- Low refrigerant levels due to leaks
- Thermostat set to extremely cold temperature (below 60°F)
- Blocked air intake preventing adequate airflow across coils
Solution Steps:
- Immediately power off the AC and allow complete defrosting (2-4 hours)
- Remove and clean or replace air filters per manufacturer guidelines
- Inspect intake vents for obstructions (fabric, dust buildup, blocked clearances)
- Ensure minimum 12-inch clearance on air intake side
- Avoid operating when outdoor temperatures drop below 65°F
- Set thermostat to moderate temperatures (68-72°F) rather than minimum settings
- If problem persists after these corrections, refrigerant leakage may require professional service
Prevention: Clean or replace air filters every 1-2 weeks during heavy use. Maintain proper airflow clearances and avoid extreme temperature settings that force prolonged compressor operation.
Damaged Drain Pan or Seals
Physical damage or seal degradation allows water to escape containment:
Symptom Identification: Water leaks from unusual locations on the unit exterior, often from panel seams, bottom edges, or areas not associated with drain ports. Leakage may be continuous regardless of condensate levels.
Root Causes:
- Cracked or corroded internal drain pan
- Deteriorated rubber gaskets and seals
- Loose panel fasteners allowing water to escape through gaps
- Physical impact damage during transport or setup
- Age-related material degradation
Solution Steps:
- Carefully inspect all external panels for cracks, gaps, or damage
- Tighten any loose screws or fasteners on access panels
- For accessible internal components, inspect visible drain pan for cracks or holes
- Replace damaged rubber drain plugs or port seals
- Apply silicone sealant to small cracks in drain pans (temporary emergency repair)
- For significant damage, contact manufacturer for replacement parts or warranty service
Replacement Considerations: If the drain pan is severely damaged and the unit is older, repair costs may approach replacement value. Compare repair expenses against purchasing a newer, more efficient unit.
Excessive Condensate Production
Sometimes leakage results from simply overwhelming the drainage system capacity:
Symptom Identification: The full tank indicator activates frequently (every 4-6 hours), and water appears even when drains are clear and the unit is level.
Root Causes:
- Extremely high humidity conditions (85%+)
- Undersized AC for tent volume creating continuous maximum-load operation
- Inadequate tent sealing allowing constant humid air infiltration
Solution Steps:
- Implement continuous gravity drainage using attached hose rather than relying on self-evaporation
- Improve tent sealing to reduce humid air infiltration
- Consider supplementing with a standalone dehumidifier to reduce moisture load
- Operate the AC at slightly warmer settings to reduce condensate production while maintaining acceptable comfort
- Ensure exhaust hose is properly installed to maximize self-evaporation efficiency
Alternative Approach: In extremely humid coastal or tropical environments, acknowledge that manual drainage every 6-8 hours may be necessary, or implement a small condensate pump for active water removal.
Diagnostic Troubleshooting Table
| Symptom | Most Likely Cause | Quick Test | Primary Solution |
| Water under drain port area | Clogged drain | Remove plug, check flow | Clear blockage, flush with vinegar solution |
| Water on uphill side of unit | Improper leveling | Check with level tool | Relevel unit or platform |
| Icing on vents + later leaking | Frozen coils | Inspect air outlets for frost | Clean filters, ensure airflow, defrost completely |
| Water from panel seams | Damaged pan/seals | Visual inspection of panels | Tighten fasteners, replace seals |
| Frequent full-tank alerts | Excessive condensate | Monitor fill frequency | Install continuous drain hose |
When to Seek Professional Service
Contact the manufacturer or qualified technician if:
- Refrigerant leakage is suspected (reduced cooling with no other obvious cause)
- Internal drain pan requires replacement beyond DIY capability
- Electrical components show water damage
- Unit is under warranty and requires authorized repair
- Multiple troubleshooting attempts don’t resolve the issue
Attempting repairs beyond basic maintenance may void warranties or create safety hazards with electrical components.
Conclusion
Installing and venting a tent air conditioner for maximum cooling efficiency requires attention to four critical elements: proper exhaust routing that completely removes hot air from the tent environment, strategic positioning that balances cooling distribution with noise management and power access, comprehensive sealing of all air leakage paths to retain conditioned air, and correct drainage configuration to prevent water damage and maintain unit performance.
The foundation of effective tent cooling begins with exhaust venting—whether through modified door panels, window inserts, or custom port installations—ensuring the shortest possible hose run with minimal bends. Complement proper venting with meticulous tent sealing, addressing windows, zippers, ground perimeters, and fabric permeability to achieve temperature differentials of 25-30°F from outside conditions.
Position your AC unit on level, stable ground near ventilation points but away from sleeping areas, maintaining proper clearances for safety and airflow. Address drainage requirements based on your humidity conditions, implementing continuous gravity drainage for high-moisture environments or monitoring self-evaporative systems in moderate climates.
When water leakage occurs, systematically diagnose the cause—blocked drains, improper leveling, frozen coils, or damaged components—and apply targeted solutions rather than assuming all leaks share the same origin. With proper installation, venting, and maintenance, your tent air conditioner will deliver reliable, efficient cooling that transforms summer camping from an endurance test into a comfortable outdoor experience.
About Everlead Outdoor
Everlead Outdoor is dedicated to creating luxury automotive camping experiences, redefining off-road adventures by blending industrial aesthetics with supremely convenient engineering. Beyond our innovative rooftop tent systems featuring Auto-Roll technology and Full LED lighting, we manufacture essential climate control solutions including tent air conditioners engineered specifically for camping environments.
Our tent AC units are designed with optimal installation in mind, featuring compact footprints for easy positioning, efficient self-evaporative drainage systems, and flexible exhaust configurations compatible with various tent designs. As an ISO 9001-certified direct manufacturer with over a decade of experience, we maintain 100% full-unit inspection to ensure every air conditioner delivers reliable cooling performance in demanding outdoor conditions.
Whether in wilderness or lakeside, Everlead provides premium outdoor sanctuaries with all-weather comfort for quality-driven adventurers worldwide.Connect with us: Email: [email protected] | Phone/WhatsApp: +86 13726240980